> ## Documentation Index
> Fetch the complete documentation index at: https://docs.petrasecurity.com/docs/llms.txt
> Use this file to discover all available pages before exploring further.
# Prospecting Report
> A white-labeled PDF that transforms 6 months of Microsoft 365 forensics into a sales-ready document for prospecting and client meetings.
The **Prospecting Report** (also called the **Autopsy Report**) is a white-labeled PDF designed to help you sell Petra to your existing clients and prospective clients. It compiles the results of a [Petra Autopsy](https://app.petrasecurity.com), a 6-month forensic investigation of a Microsoft 365 tenant, into a polished, client-ready document that demonstrates real security gaps your clients didn't know existed.
Use this report in client meetings and QBRs to make deploying Petra a no-brainer. It's the most effective way to show a prospect what's actually happening in their environment.
## What the Report Includes
The Prospecting Report is structured to walk a prospect through real findings in their own environment:
* **Cover Page**: White-labeled with your organization's logo, name, contact email, tenant name, and reporting period.
* **Why M365 Protection Matters**: An overview of the M365 threat landscape and why dedicated protection is critical.
* **How to Evaluate Your Current M365 Security Provider**: Five key questions to help prospects assess whether their current security stack is adequate (detection speed, response time, employee disruption, attacker activity visibility, phishing removal).
* **What Threat Hunting Was Performed**: How many logs were analyzed, which M365 services were covered, and the threat-hunting techniques used (impossible travel detection, proxy use analysis, behavioral baselining).
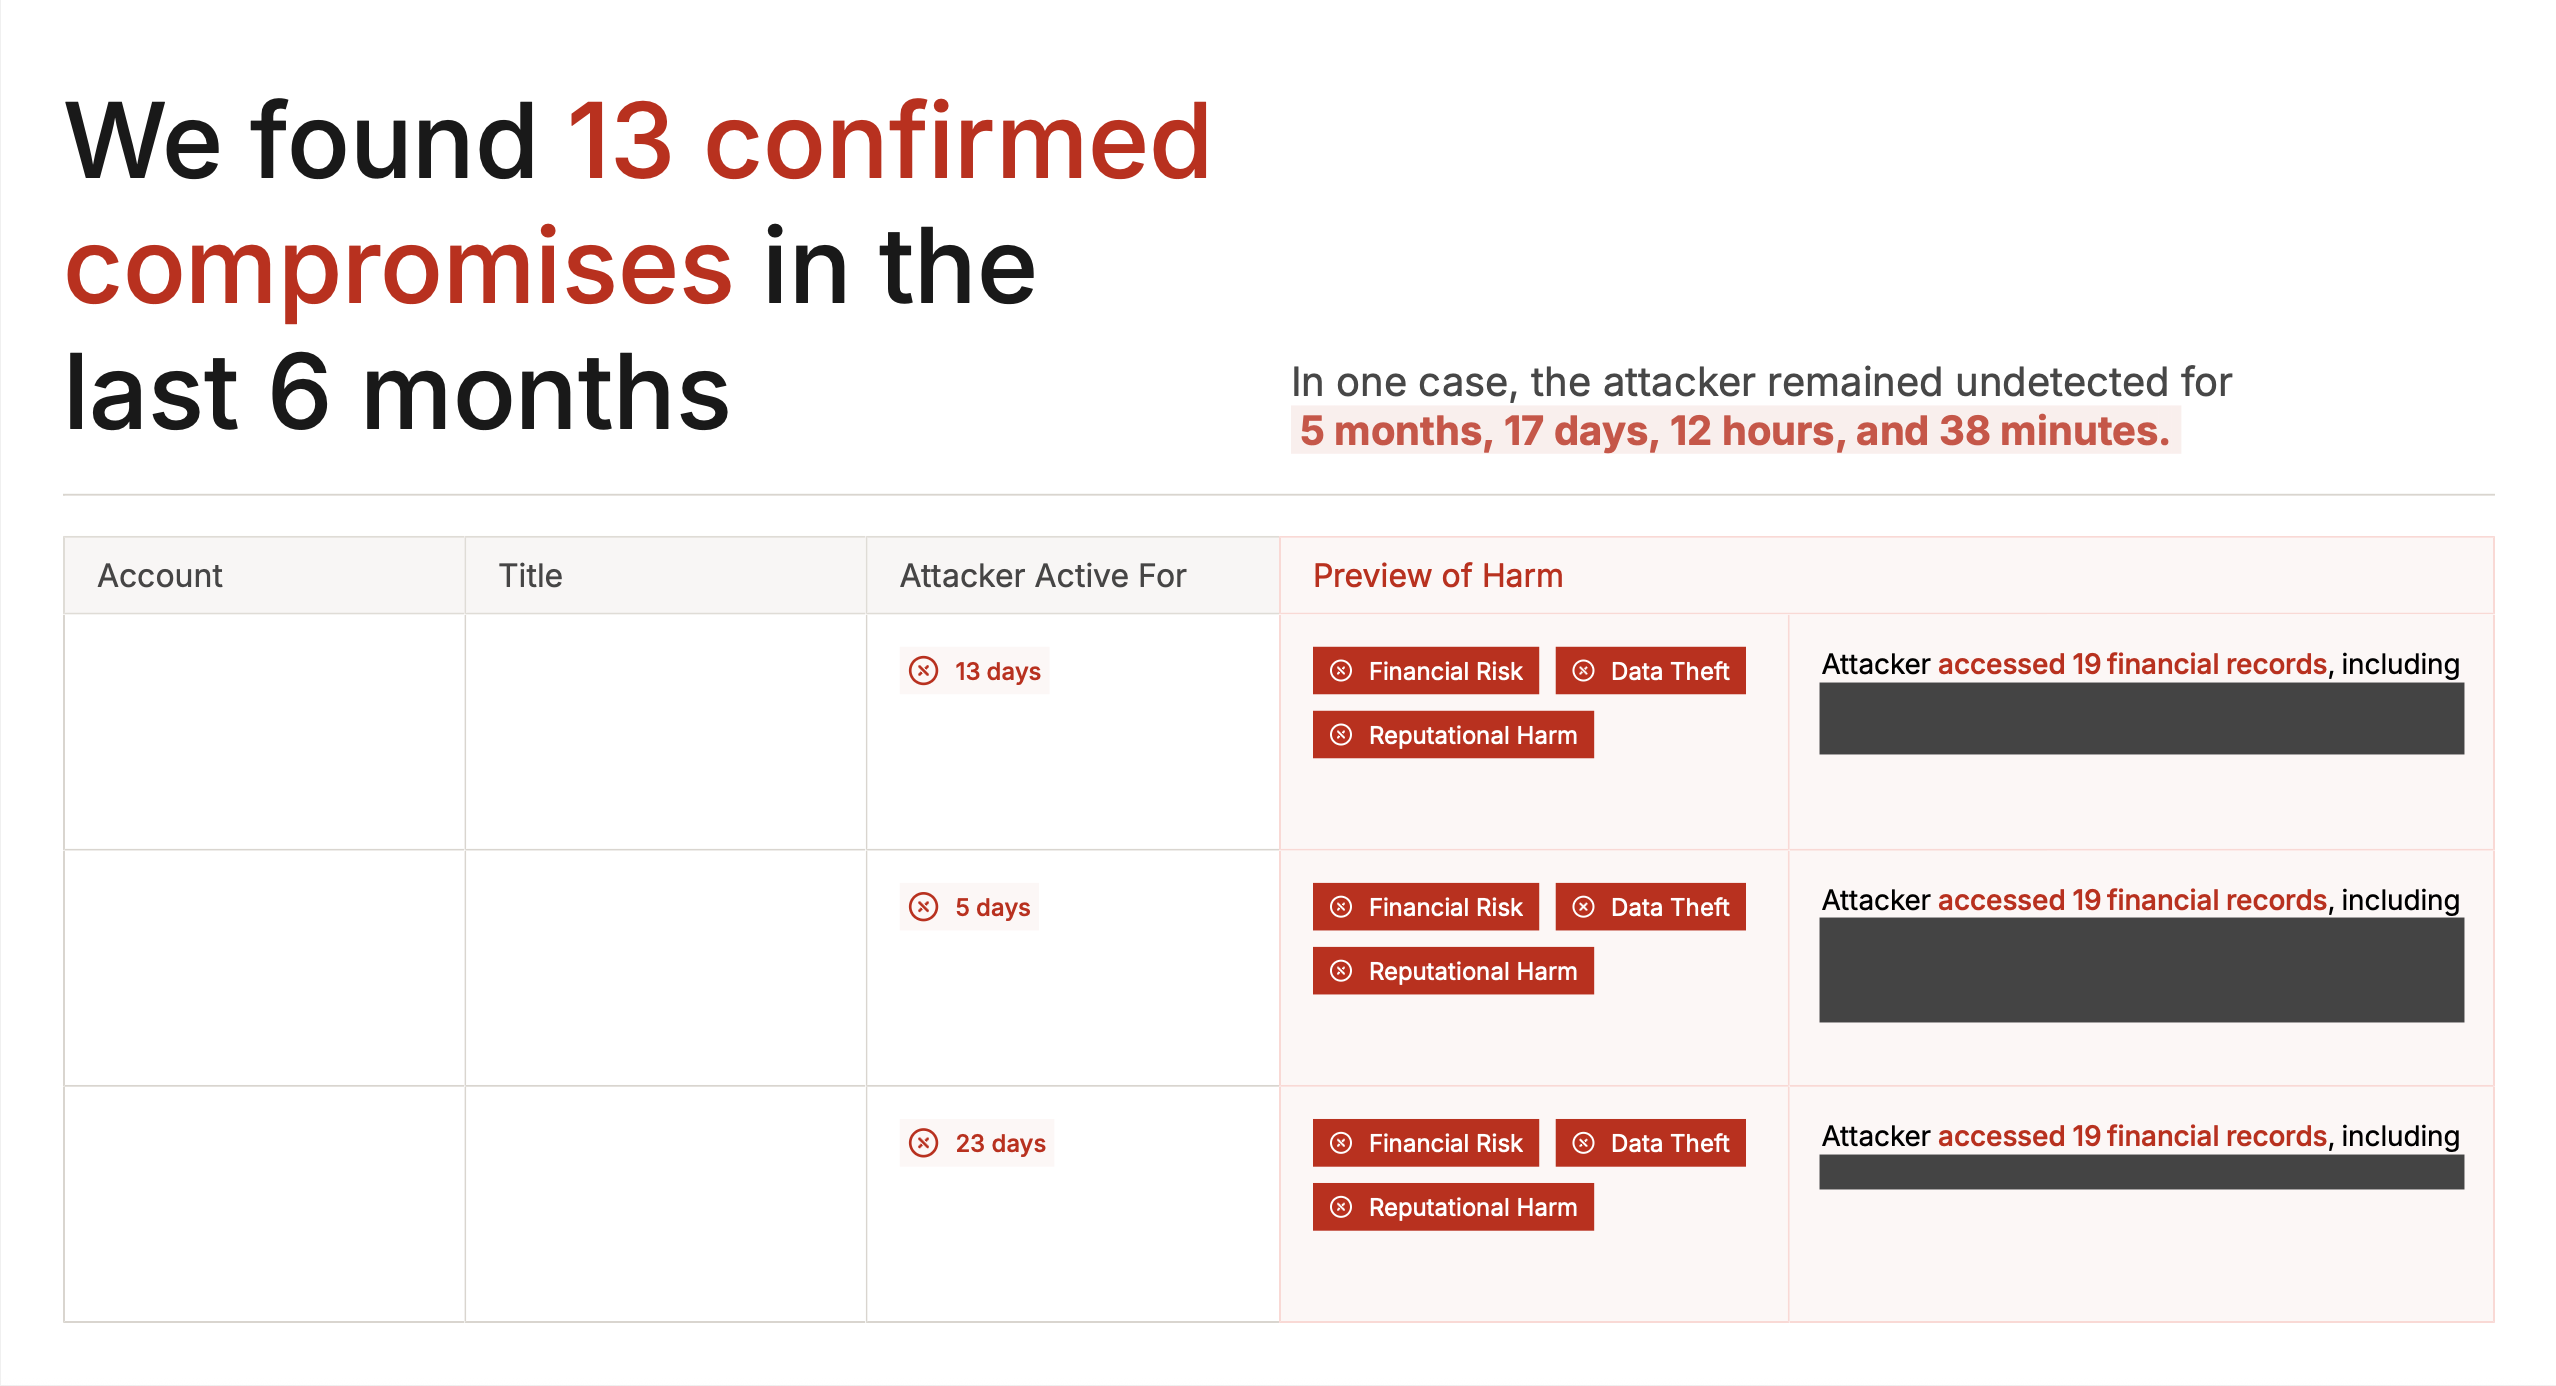
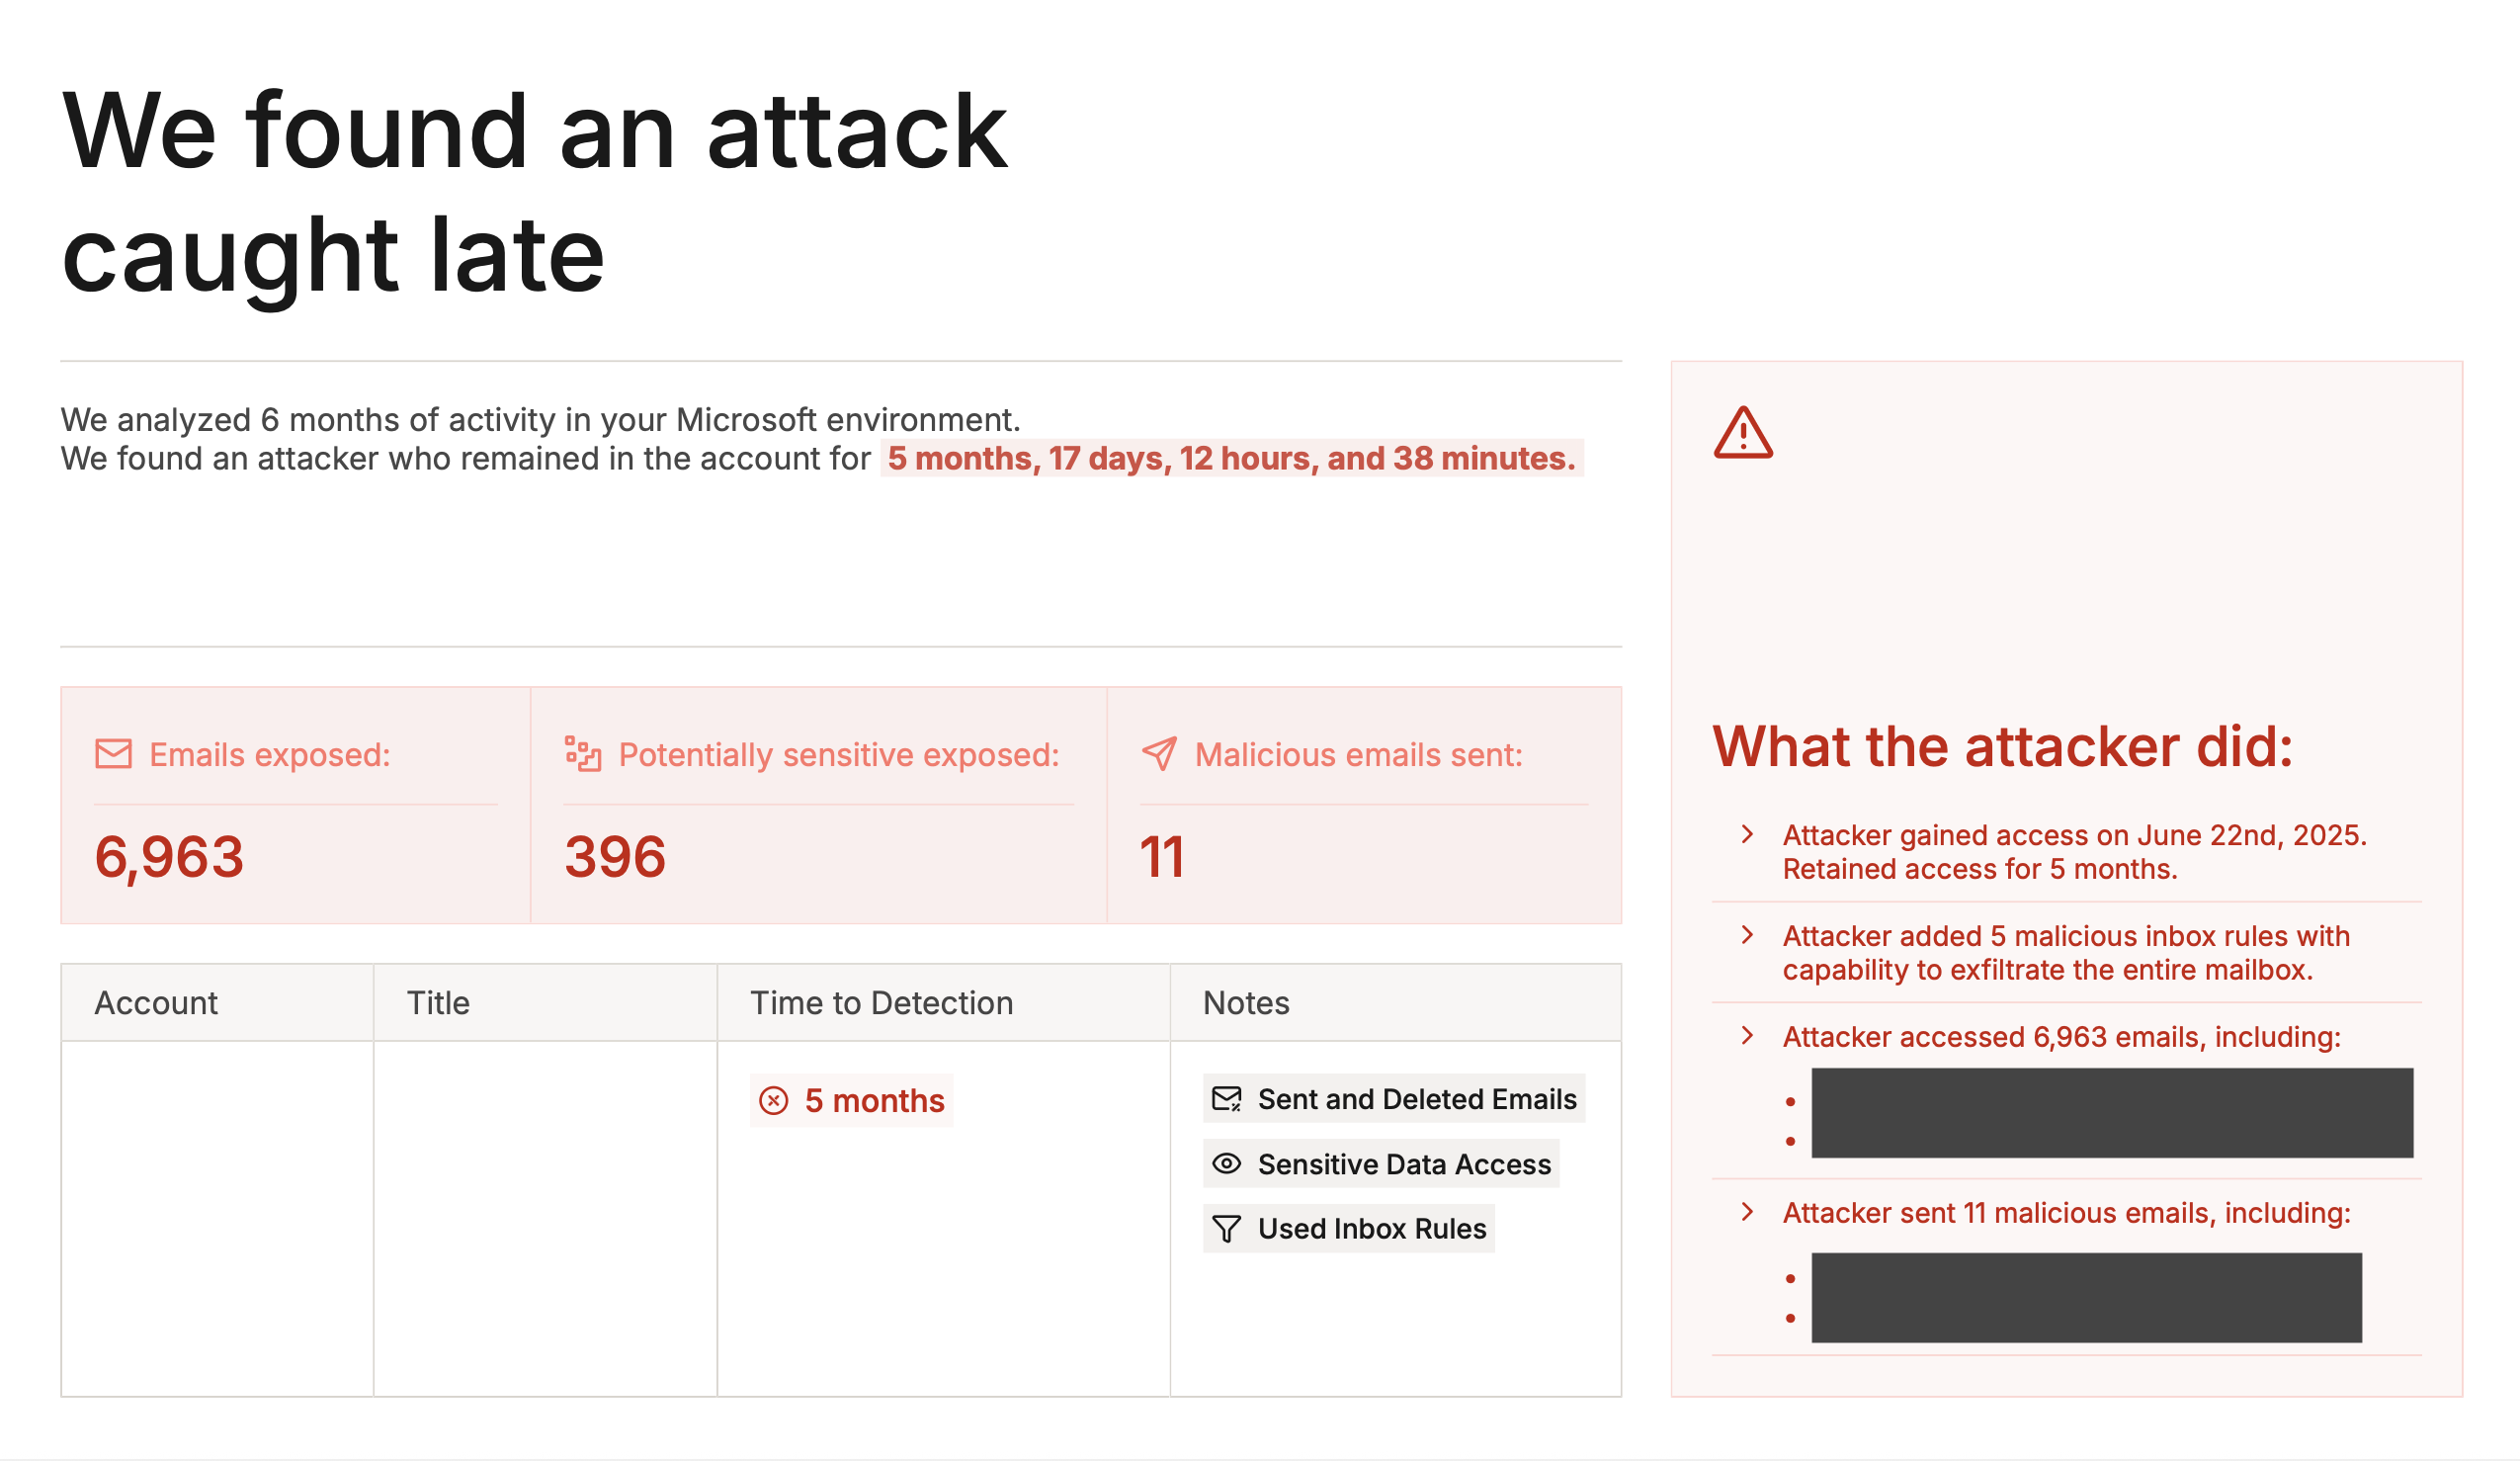
* **Incident Details**: Each discovered incident with full forensics, including:
* Whether the compromise was historical or an active attacker still in the account
* Blast radius (emails accessed, documents accessed, emails sent by the attacker, documents modified or deleted)
* Persistence mechanisms (inbox rules, app consents)
* Phishing evidence (phishing emails found, sender addresses, subject lines)
* Time-to-detection badges showing how long the attacker was active
* **Incidents Table**: A summary table of all incidents with key metrics at a glance.
* **"What Should Have Happened" Timeline**: A hypothetical timeline showing how Petra would have caught and responded to the highlighted incident in real time, contrasted against what actually happened.

 ## When the Report Is Generated
The Prospecting Report is generated automatically once the Petra team completes the Autopsy investigation for a tenant. No action is required on your part — when all incidents have been triaged and the analysis is complete, the report is created and you are notified.
## How to Access the Report
### Via Email
When the Autopsy is complete, an email is sent with the subject **"Petra Autopsy Complete for \[Tenant Name]"**. The email includes:
* A summary of what Petra found (number of prior compromises and active attackers)
* Details on each incident discovered
* A link to the Petra dashboard where you can download the full PDF report
### Via the Incidents Page
After the Autopsy completes, a **"Your Autopsy Report is Ready"** banner appears at the top of the **Incidents** page for the tenant. Click the **Download Report** button on the banner to download the PDF. This banner is visible for 7 days after the report is generated.
### Via the Reporting Tab
All Prospecting Reports are permanently available in the **Reporting** tab under the **Automated Reports** sub-tab. The **Autopsy Reports** section lists every generated report with the tenant name and date — click **Download** next to any report to get the PDF.
This is the same tab where previously generated automated monthly tenant report ZIPs are stored. See [Downloading Previously Generated Reports](/reporting/tenant-report#downloading-previously-generated-reports) for more on that.
## Who Receives the Autopsy Complete Email
The Autopsy complete email is sent to:
* **Your organization's notification recipients** configured for that tenant (see [Update Incident Notification Methods](/settings/update-incident-notification-methods))
* **Organization admins** during trial
After receiving the Prospecting Report, consider [anonymizing](/changelog#anonymize-incidents) one of the incidents and using it as a cautionary tale when pitching to other prospects.
## Using the Report for Sales
The Prospecting Report is purpose-built for prospecting and closing deals. Here are some ways to use it:
* **Client meetings and QBRs**: Walk through the findings to show clients what attackers have done in their environment and what their current provider missed.
* **Prospect pitches**: Run an Autopsy on a prospect's tenant and use the report to demonstrate Petra's value with real data from their own environment.
* **Competitive displacement**: The "How to Evaluate Your Current M365 Security Provider" section and "What Should Have Happened" timeline directly highlight gaps in existing solutions.
* **Urgency creation**: Active attackers found during the Autopsy require immediate action, creating natural urgency to deploy Petra.
## Customizing Report Branding
Prospecting Reports use the same white-label branding as tenant reports. To update the logo, organization name, or contact email that appear in the PDF, go to **Settings > Branding**. See [Customizing Report Branding](/reporting/tenant-report#customizing-report-branding) for details.
## Additional Sales Resources
Visit the [Marketing Hub](https://app.petrasecurity.com/marketing) in the Petra dashboard for additional sales materials, including:
* **Autopsy One-Pager**: A one-page overview of Petra Autopsy capabilities
* **Example Scan Report**: A sample report you can share before running an actual Autopsy
* **Forensic Analysis One-Pager**: Overview of Petra's forensic analysis capabilities
* **Threat Intel presentations**: White-label ready slides on ITDR capabilities
## When the Report Is Generated
The Prospecting Report is generated automatically once the Petra team completes the Autopsy investigation for a tenant. No action is required on your part — when all incidents have been triaged and the analysis is complete, the report is created and you are notified.
## How to Access the Report
### Via Email
When the Autopsy is complete, an email is sent with the subject **"Petra Autopsy Complete for \[Tenant Name]"**. The email includes:
* A summary of what Petra found (number of prior compromises and active attackers)
* Details on each incident discovered
* A link to the Petra dashboard where you can download the full PDF report
### Via the Incidents Page
After the Autopsy completes, a **"Your Autopsy Report is Ready"** banner appears at the top of the **Incidents** page for the tenant. Click the **Download Report** button on the banner to download the PDF. This banner is visible for 7 days after the report is generated.
### Via the Reporting Tab
All Prospecting Reports are permanently available in the **Reporting** tab under the **Automated Reports** sub-tab. The **Autopsy Reports** section lists every generated report with the tenant name and date — click **Download** next to any report to get the PDF.
This is the same tab where previously generated automated monthly tenant report ZIPs are stored. See [Downloading Previously Generated Reports](/reporting/tenant-report#downloading-previously-generated-reports) for more on that.
## Who Receives the Autopsy Complete Email
The Autopsy complete email is sent to:
* **Your organization's notification recipients** configured for that tenant (see [Update Incident Notification Methods](/settings/update-incident-notification-methods))
* **Organization admins** during trial
After receiving the Prospecting Report, consider [anonymizing](/changelog#anonymize-incidents) one of the incidents and using it as a cautionary tale when pitching to other prospects.
## Using the Report for Sales
The Prospecting Report is purpose-built for prospecting and closing deals. Here are some ways to use it:
* **Client meetings and QBRs**: Walk through the findings to show clients what attackers have done in their environment and what their current provider missed.
* **Prospect pitches**: Run an Autopsy on a prospect's tenant and use the report to demonstrate Petra's value with real data from their own environment.
* **Competitive displacement**: The "How to Evaluate Your Current M365 Security Provider" section and "What Should Have Happened" timeline directly highlight gaps in existing solutions.
* **Urgency creation**: Active attackers found during the Autopsy require immediate action, creating natural urgency to deploy Petra.
## Customizing Report Branding
Prospecting Reports use the same white-label branding as tenant reports. To update the logo, organization name, or contact email that appear in the PDF, go to **Settings > Branding**. See [Customizing Report Branding](/reporting/tenant-report#customizing-report-branding) for details.
## Additional Sales Resources
Visit the [Marketing Hub](https://app.petrasecurity.com/marketing) in the Petra dashboard for additional sales materials, including:
* **Autopsy One-Pager**: A one-page overview of Petra Autopsy capabilities
* **Example Scan Report**: A sample report you can share before running an actual Autopsy
* **Forensic Analysis One-Pager**: Overview of Petra's forensic analysis capabilities
* **Threat Intel presentations**: White-label ready slides on ITDR capabilities