> ## Documentation Index
> Fetch the complete documentation index at: https://docs.petrasecurity.com/docs/llms.txt
> Use this file to discover all available pages before exploring further.
# Autotask PSA Integration
> Connect Petra with Autotask PSA for automated ticketing and billing sync.
Click **Verify Permissions** on the Autotask integration page in Petra. It runs every permission check in one pass and tells you exactly what is missing.
 ## Ticketing
### Prerequisites
* Petra account
* Autotask PSA administrator permissions
### 1. Create an Autotask API user
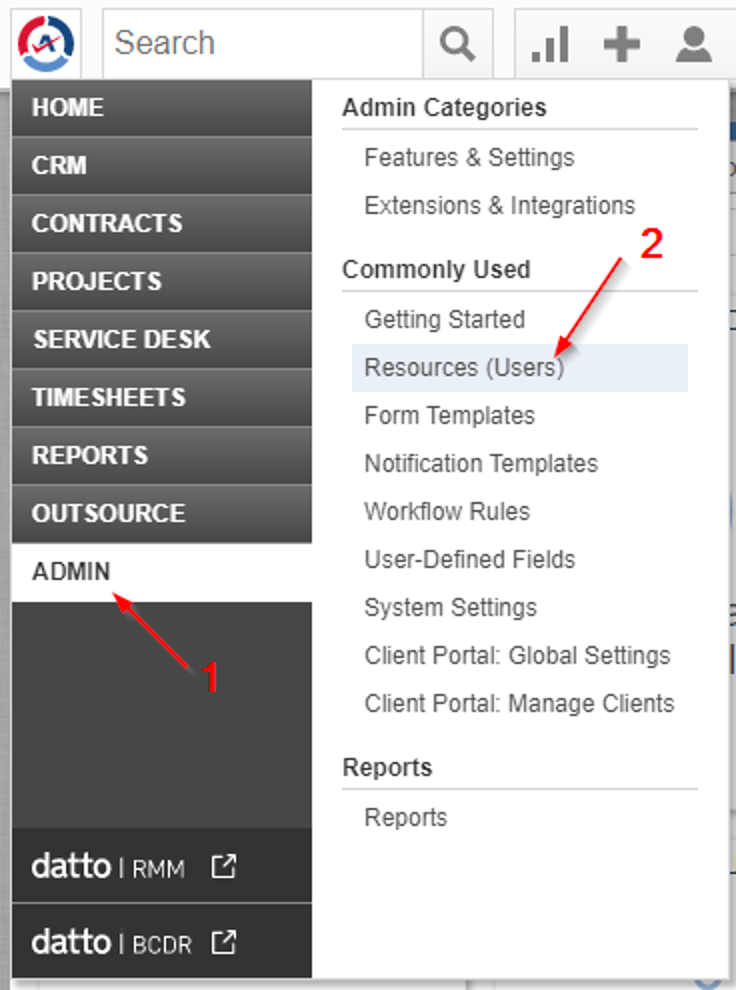
1. In Autotask, open the sidebar and click **Admin** → **Resources (Users)**.
## Ticketing
### Prerequisites
* Petra account
* Autotask PSA administrator permissions
### 1. Create an Autotask API user
1. In Autotask, open the sidebar and click **Admin** → **Resources (Users)**.
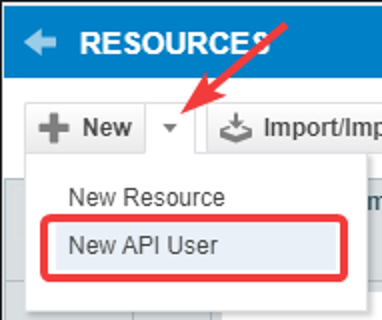
 2. Hover over the dropdown next to the "+ New" button in the top-left and select **New API User**.
 3. In the General section, set the following values:
* **First Name**: Petra Security
* **Last Name**: API
* **Security Level**: API User (system)
* **Email Address**: Any value is acceptable; it does not need to be a real inbox
* **Username** and **Password**: Generate values, store them securely
* **API Tracking Identifier**: Choose "Custom (Internal Integration)"
* If prompted for a name, use **Petra Security**
* Copy the generated **Tracking Identifier** for use in Petra
The username, password, and Tracking Identifier are required to link Petra with Autotask. Keep them handy for the next step.
### 2. Link Autotask in Petra
1. Go to Settings: [https://app.petrasecurity.com/settings](https://app.petrasecurity.com/settings) and click **Link Autotask**.
3. In the General section, set the following values:
* **First Name**: Petra Security
* **Last Name**: API
* **Security Level**: API User (system)
* **Email Address**: Any value is acceptable; it does not need to be a real inbox
* **Username** and **Password**: Generate values, store them securely
* **API Tracking Identifier**: Choose "Custom (Internal Integration)"
* If prompted for a name, use **Petra Security**
* Copy the generated **Tracking Identifier** for use in Petra
The username, password, and Tracking Identifier are required to link Petra with Autotask. Keep them handy for the next step.
### 2. Link Autotask in Petra
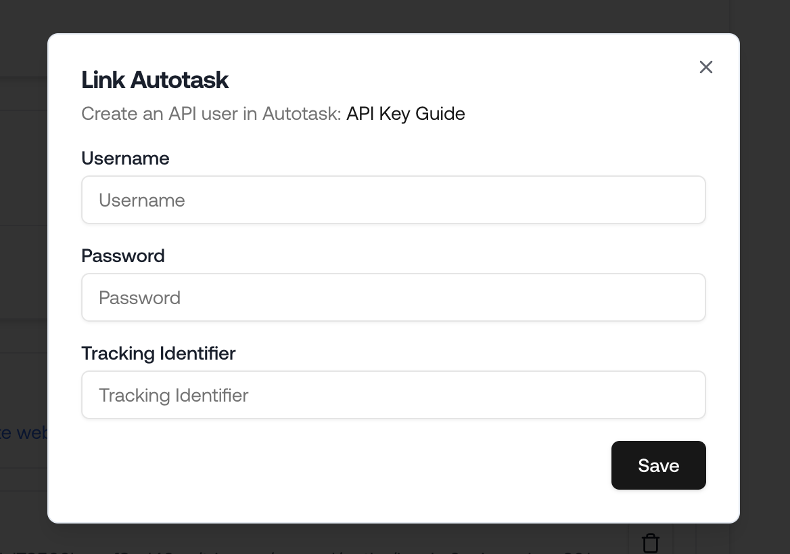
1. Go to Settings: [https://app.petrasecurity.com/settings](https://app.petrasecurity.com/settings) and click **Link Autotask**.
 2. In the dialog, enter the **Username**, **Password**, and **Tracking Identifier** you created in Autotask, then click **Save**.
 After saving, Autotask can take 1–2 minutes to respond. The page will update automatically once the connection is confirmed.
### 3. Configure mappings
Once connected, you’ll be redirected to the configuration page where you can:
* Map each Petra tenant to the corresponding **Autotask Company**
* Select the **Queue** for new tickets
* Choose **Status** values for ticket creation and updates
Changes are saved automatically. You can revisit these settings anytime from the Petra Settings page.
### Troubleshooting
Click **Verify Permissions** on the Autotask integration page in Petra. It runs every permission check in one pass and tells you exactly what is missing.
* **Authentication failed**: Re-enter the Username, Password, and Tracking Identifier. Confirm the user’s Security Level is "API User (system)" in Autotask.
* **Permission or 403 errors**: Ensure the API user is active and has the correct security role.
* **Slow connection/timeout**: Wait 1–2 minutes and try again. If issues persist, contact Petra Support.
Need help? Email us at [support@petrasecurity.com](mailto:support@petrasecurity.com).
***
## Delete Integration
Deleting a PSA integration is permanent. All associated data, including tickets, company mappings, queues, statuses, and priorities, will be removed and cannot be recovered.
Only **Admins** can delete a PSA integration. Full Members, Sales, and other roles do not have permission to perform this action.
To delete your Autotask integration:
1. Go to [Settings](https://app.petrasecurity.com/settings) and open your Autotask integration page.
2. Click **Delete Integration**.
3. Confirm the deletion in the dialog.
Once confirmed, Petra removes all Autotask data from your organization, including synced companies, queues, statuses, priorities, ticket records, contract mappings, and tenant-to-company mappings. Billing sync stops immediately.
If you need to reconnect Autotask later, follow the setup steps in [Ticketing](#ticketing) above to link a new integration from scratch.
***
## Billing
Petra can sync billing data to Autotask by writing unit counts to Recurring Service Contracts. This section covers the additional setup required beyond the ticketing integration above.
### Additional Permissions
The API user created in [step 1](#1-create-an-autotask-api-user) needs access to the following Autotask modules for billing sync:
* **Contracts** — read and write access to Recurring Service Contracts
* **Services** — read access to Services within those contracts
If the API user's security level does not include these permissions, billing sync requests will fail with `401 Unauthorized`. Verify the security level grants access to both modules.
### Setting Up Billing Sync
For each tenant you want to bill through Autotask, create a **Recurring Service Contract** in Autotask. Then, in Petra:
1. Select the customer (Autotask Company).
2. Choose the contract — Petra shows contracts filtered to that customer.
3. Select the service line item within that contract.
Petra will sync unit counts to the selected service line item on each billing cycle.
### Retrying a Single Tenant
If billing sync fails for one tenant, you do not need to re-run the full sync. Click the **Retry** button next to the failed tenant in the billing sync results table. Petra will re-compute that tenant's live billable count and sync only that tenant to Autotask.
### Future-Dated Contracts
During billing sync, Petra fetches the mapped Autotask Recurring Service Contract and validates that its billing period has begun. If the contract's start date is in the future, Petra will not attempt to push any unit adjustments — Autotask rejects adjustments on contracts that haven't started yet, which would otherwise surface as an unhelpful generic 500 error. Instead, the sync will fail for that tenant with a clear message:
> Contract "*Contract Name*" has a start date of YYYY-MM-DD, which is in the future. Billing cannot be synced until the contract period has begun — update the contract start date in Autotask or wait until the contract is active.
This commonly happens when a new contract is created in Autotask ahead of a future go-live date and is mapped to a tenant in Petra before the contract period begins.
To resolve this, either:
1. Update the contract start date in Autotask to today or a past date if billing should begin immediately.
2. Wait until the contract's start date has passed, then retry the sync.
Similarly, if a contract's end date has already passed, Petra will fail with:
> Contract "*Contract Name*" ended on YYYY-MM-DD. Billing cannot be synced to an expired contract — extend the contract end date in Autotask or map this tenant to an active contract.
### Duplicate Service Detection
During billing sync, Petra matches each tenant's Autotask contract to the mapped service line item. If the same Autotask Service appears more than once on a single Recurring Service Contract — which can happen due to distributor sync issues (e.g., Ingram Micro) or accidental SKU duplication by sales staff — Petra will not attempt to update either line item. Instead, the sync will fail for that tenant with the following error:
> Duplicate service found — the mapped Autotask Service appears *N* times on this contract. Remove the duplicate in Autotask by deleting it (if not yet invoiced) or setting its units to 0 with a past-dated removal, then retry.
To resolve this, clean up the duplicate in Autotask using one of these methods:
1. **Delete the duplicate** — if the extra ContractService line item has not been invoiced, delete it directly.
2. **Zero out the duplicate** — if it has been invoiced, set its units to 0 with a removal date in the past. It will drop off the contract once that date has passed.
Once only a single instance of the service remains on the contract, retry the billing sync.
Need help? Email us at [support@petrasecurity.com](mailto:support@petrasecurity.com).
After saving, Autotask can take 1–2 minutes to respond. The page will update automatically once the connection is confirmed.
### 3. Configure mappings
Once connected, you’ll be redirected to the configuration page where you can:
* Map each Petra tenant to the corresponding **Autotask Company**
* Select the **Queue** for new tickets
* Choose **Status** values for ticket creation and updates
Changes are saved automatically. You can revisit these settings anytime from the Petra Settings page.
### Troubleshooting
Click **Verify Permissions** on the Autotask integration page in Petra. It runs every permission check in one pass and tells you exactly what is missing.
* **Authentication failed**: Re-enter the Username, Password, and Tracking Identifier. Confirm the user’s Security Level is "API User (system)" in Autotask.
* **Permission or 403 errors**: Ensure the API user is active and has the correct security role.
* **Slow connection/timeout**: Wait 1–2 minutes and try again. If issues persist, contact Petra Support.
Need help? Email us at [support@petrasecurity.com](mailto:support@petrasecurity.com).
***
## Delete Integration
Deleting a PSA integration is permanent. All associated data, including tickets, company mappings, queues, statuses, and priorities, will be removed and cannot be recovered.
Only **Admins** can delete a PSA integration. Full Members, Sales, and other roles do not have permission to perform this action.
To delete your Autotask integration:
1. Go to [Settings](https://app.petrasecurity.com/settings) and open your Autotask integration page.
2. Click **Delete Integration**.
3. Confirm the deletion in the dialog.
Once confirmed, Petra removes all Autotask data from your organization, including synced companies, queues, statuses, priorities, ticket records, contract mappings, and tenant-to-company mappings. Billing sync stops immediately.
If you need to reconnect Autotask later, follow the setup steps in [Ticketing](#ticketing) above to link a new integration from scratch.
***
## Billing
Petra can sync billing data to Autotask by writing unit counts to Recurring Service Contracts. This section covers the additional setup required beyond the ticketing integration above.
### Additional Permissions
The API user created in [step 1](#1-create-an-autotask-api-user) needs access to the following Autotask modules for billing sync:
* **Contracts** — read and write access to Recurring Service Contracts
* **Services** — read access to Services within those contracts
If the API user's security level does not include these permissions, billing sync requests will fail with `401 Unauthorized`. Verify the security level grants access to both modules.
### Setting Up Billing Sync
For each tenant you want to bill through Autotask, create a **Recurring Service Contract** in Autotask. Then, in Petra:
1. Select the customer (Autotask Company).
2. Choose the contract — Petra shows contracts filtered to that customer.
3. Select the service line item within that contract.
Petra will sync unit counts to the selected service line item on each billing cycle.
### Retrying a Single Tenant
If billing sync fails for one tenant, you do not need to re-run the full sync. Click the **Retry** button next to the failed tenant in the billing sync results table. Petra will re-compute that tenant's live billable count and sync only that tenant to Autotask.
### Future-Dated Contracts
During billing sync, Petra fetches the mapped Autotask Recurring Service Contract and validates that its billing period has begun. If the contract's start date is in the future, Petra will not attempt to push any unit adjustments — Autotask rejects adjustments on contracts that haven't started yet, which would otherwise surface as an unhelpful generic 500 error. Instead, the sync will fail for that tenant with a clear message:
> Contract "*Contract Name*" has a start date of YYYY-MM-DD, which is in the future. Billing cannot be synced until the contract period has begun — update the contract start date in Autotask or wait until the contract is active.
This commonly happens when a new contract is created in Autotask ahead of a future go-live date and is mapped to a tenant in Petra before the contract period begins.
To resolve this, either:
1. Update the contract start date in Autotask to today or a past date if billing should begin immediately.
2. Wait until the contract's start date has passed, then retry the sync.
Similarly, if a contract's end date has already passed, Petra will fail with:
> Contract "*Contract Name*" ended on YYYY-MM-DD. Billing cannot be synced to an expired contract — extend the contract end date in Autotask or map this tenant to an active contract.
### Duplicate Service Detection
During billing sync, Petra matches each tenant's Autotask contract to the mapped service line item. If the same Autotask Service appears more than once on a single Recurring Service Contract — which can happen due to distributor sync issues (e.g., Ingram Micro) or accidental SKU duplication by sales staff — Petra will not attempt to update either line item. Instead, the sync will fail for that tenant with the following error:
> Duplicate service found — the mapped Autotask Service appears *N* times on this contract. Remove the duplicate in Autotask by deleting it (if not yet invoiced) or setting its units to 0 with a past-dated removal, then retry.
To resolve this, clean up the duplicate in Autotask using one of these methods:
1. **Delete the duplicate** — if the extra ContractService line item has not been invoiced, delete it directly.
2. **Zero out the duplicate** — if it has been invoiced, set its units to 0 with a removal date in the past. It will drop off the contract once that date has passed.
Once only a single instance of the service remains on the contract, retry the billing sync.
Need help? Email us at [support@petrasecurity.com](mailto:support@petrasecurity.com).